
Removing tiles from a wall can feel intimidating at first, especially if you have never done any kind of home improvement work before. Tiles are designed to stay firmly in place for years, sometimes decades, which means taking them off requires patience, the right tools, and a careful approach. Whether you are renovating a bathroom, updating a kitchen backsplash, or repairing damaged tiles, understanding how do you remove tiles from a wall safely and effectively can save you time, money, and frustration.
This article explains the entire process in detail, from preparation to cleanup, while also highlighting common mistakes and safety considerations. The goal is not just to remove tiles, but to protect the wall underneath so it can be reused or refinished.
Understanding Wall Tiles and What Holds Them in Place
Before starting, it helps to understand how tiles are attached to walls. Wall tiles are typically installed using tile adhesive (also known as thinset or mastic), which bonds the tile to drywall, cement board, or plaster. Grout fills the gaps between tiles and hardens over time, adding extra rigidity.
Because of this layered structure, removing tiles is not simply a matter of pulling them off. The adhesive and grout must be carefully broken so the tile can be removed without excessive damage to the wall surface.
Tools and Materials You Will Need
Having the correct tools makes a significant difference. You do not need professional-grade equipment, but basic tools are essential.
- Safety goggles
- Heavy-duty gloves
- Dust mask
- Hammer
- Cold chisel or putty knife
- Pry bar
- Utility knife
- Scraper
- Bucket or trash bag
- Drop cloth or plastic sheeting
Safety gear is especially important because tile shards can be sharp, and dust from grout or adhesive can irritate your lungs and eyes.
Preparing the Area Before Removing Tiles
Preparation is one of the most overlooked steps, yet it is critical. Start by clearing the area around the wall. Remove furniture, cover countertops, and protect floors with a drop cloth. Tile removal can get messy, and broken pieces can travel farther than you expect.
Next, shut off any electrical outlets near the tiled area if applicable. If tiles are near water fixtures, ensure the water supply is turned off to avoid accidental leaks.
Finally, examine the wall carefully. Identify loose or cracked tiles, as these are usually the best place to begin.
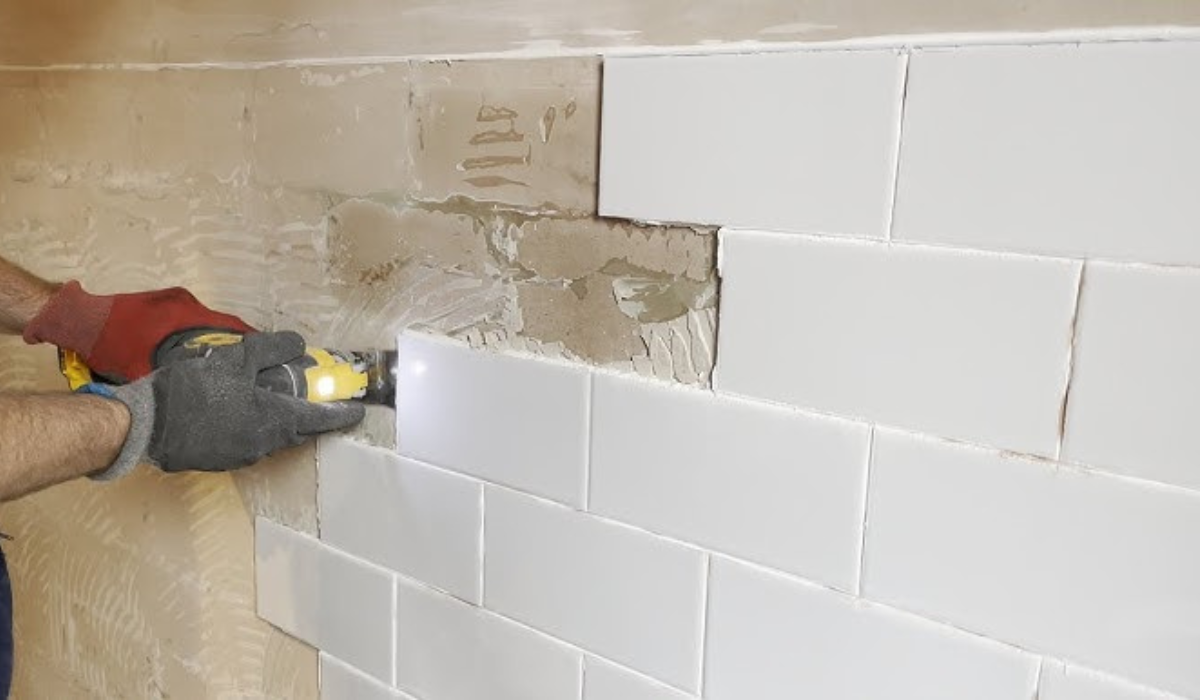
How Do You Remove Tiles from a Wall Step by Step
Step 1: Remove the Grout
Grout locks tiles together, so breaking it first makes tile removal much easier. Use a utility knife or grout removal tool to carefully cut through the grout lines around one tile. Work slowly to avoid slipping and damaging the wall behind the tile.
This step reduces resistance and helps prevent neighboring tiles from cracking unintentionally.
Step 2: Start with a Loose Tile or Edge
If any tiles are already loose, start there. Position a chisel or putty knife at a slight angle behind the tile. Gently tap the tool with a hammer until the tile begins to lift away from the wall.
If no loose tiles exist, start at an edge or corner where leverage is easier to apply.
Step 3: Pry the Tile Away Carefully
Once the tool is behind the tile, apply gentle pressure to pry it off. Avoid using excessive force, as this can tear chunks of drywall or cement board off with the tile.
Some tiles may come off in one piece, while others may break. Both outcomes are normal.
Step 4: Continue Tile by Tile
After removing the first tile, repeat the process for the surrounding tiles. Removing one tile usually exposes the edges of others, making the rest easier to remove.
Work in small sections and maintain control over your tools. Rushing increases the risk of injury or wall damage.
Step 5: Remove Remaining Adhesive
After all tiles are removed, adhesive residue will likely remain on the wall. Use a scraper or putty knife to gently remove it. In some cases, warm water or a mild adhesive softener can help loosen stubborn spots.
This step is essential if you plan to retile or repaint the wall.
Dealing with Different Wall Surfaces
The method for tile removal can vary depending on what is behind the tile.
- Drywall: More fragile and easily damaged. Expect some repairs.
- Cement board: More durable and ideal for bathrooms.
- Plaster: Hard but brittle, requiring extra care.
Understanding your wall type helps you set realistic expectations for repair work afterward.
Common Mistakes to Avoid
Many people damage their walls unnecessarily by making simple mistakes.
Avoid these common errors:
- Skipping safety gear
- Using too much force
- Not removing grout first
- Trying to remove large sections at once
- Ignoring wall repairs until later
Taking your time almost always leads to better results.
What to Do After Tile Removal
Once the tiles and adhesive are removed, inspect the wall. Small gouges or holes are normal and can be fixed with joint compound or patching material.
After repairs, the wall should be sanded smooth and cleaned before applying new tiles, paint, or another finish.
Is It Possible to Reuse Wall Tiles?
In some cases, yes. If tiles are removed cleanly and without cracks, they can sometimes be reused. However, most wall tiles break during removal due to strong adhesive bonds.
If reuse is your goal, work extra slowly and focus on preserving individual tiles rather than speed.
Final Thoughts
Understanding how do you remove tiles from a wall is about more than just brute force. It requires planning, patience, and the right technique. By following a structured approach—removing grout, starting at the edges, and working carefully—you can successfully remove tiles while minimizing damage to the wall underneath.
Whether your project is small or large, the principles remain the same: protect yourself, respect the materials, and work methodically. With these steps, tile removal becomes a manageable and rewarding home improvement task.
Informational FAQs
1. How long does it take to remove tiles from a wall?
The time depends on the size of the area and how strongly the tiles are bonded. A small backsplash may take a few hours, while a full bathroom wall can take a day or more.
2. Can tiles be removed without damaging the wall?
Minor damage is common, especially with drywall. Careful technique reduces damage, but some repair is usually necessary.
3. Do I need special tools to remove wall tiles?
Basic hand tools like a hammer, chisel, and scraper are usually sufficient. Power tools are optional but not required.
4. Is it safe to remove tiles by myself?
Yes, as long as proper safety gear is used and the work is done carefully.
5. Should I remove old tiles before installing new ones?
In most cases, yes. Removing old tiles allows for a smoother, more secure installation of new materials.